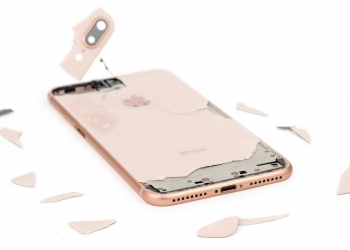
-
Recent Reviews
Categories
-
Archives
-
Calendar
The guys at iFixit has done it again with another round of tear down of the iPhone 5. While most might find the iPhone 5 design to be similar as the previous model, the assembly of the iPhone 5 is actually very different.
Instead of opening from the back to access the front, the iPhone 5 adopts a top down approach assembly. To remove the front glass, which is the more commonly replaced component, all you’ll need is a a pentalobe screwdriver and a suction cup to lift the glass. This is a remarkable improvement and definitely makes broken glass replacement fairly quick. According to iFixit, the iPhone 4S takes about 45 minutes to replace the front glass but it takes about 10-15 minutes to replace the glass on the iPhone 5.
Other discovery includes a slightly higher voltage battery at 3.8V (iPhone 4S: 3.7V) and it comes with 1,440mAh capacity. The durable iPhone 5 aluminium frame is surprisingly light, being only slightly heavier than the front glass.
Head after the break for the tear down review video. Visit iFixit for the full tear down guide.
Ever wondered how the Sony Xperia S is being put together? A Chinese site, XDA.CN had posted a step by step disassembly guide of the Xperia S from start to finish.
The tear down looks easy with a couple of screws that’s colour coded. The inner back cover houses the NFC module that’s connected by a ribbon cable. The battery inside looks like a standard Sony Ericsson which is reported to be easily replaced.
Head after the break for some photos and disassembly video.
The new iPad 3rd generation goes on sale today and has already gotten a tear down treatment by iFixit. One of them flew all the way to Melbourne and was the first in line to purchase it for the sake of dismantling.
They have gotten the 4G + WiFi version but unfortunately it doesn’t work on Telstra’s 4G Network. The 4G LTE support on the new iPad is limited to 700MHz and 2100MHz frequency but Telstra’s LTE network runs at 1800MHz. Despite that, it should be faster than normal 3G as it supports HSPA+ up to 42Mbps on telcos that support DC-HSPA. On the tear down process, the LCD and the huge new battery was reported to be easy to dismantle. However the front panel like the previous iPad 2 is still fused with the device, making it a challenge to remove.
Head after the break for step by step disassembly or head straight to iFixit.

The iPhone 4S has finally gotten its innards expose with iFixit professional tear down. Apart from the new processor, 8MP camera and dual CDMA/GSM support, we are able to find out what else is new on this model compared to the previous iPhone 4.
First is the RAM which was earlier said to be either 512MB or 1GB. From the tear down, it is finally confirmed that the iPhone 4S offers 512MB which is the same capacity as the previous model. This was identified from the marking on the A5 chip.
Another surprise is the battery which has a slightly higher capacity of 5.3Whr. This is 0.05Whr more than the original iPhone 4 which is rated at 5.25Whr. For those that are used to mAh battery capacity rating, that’s an extra 14mAh. The vibrator is using the one found on the CDMA version of the iPhone 4 which is reported to be quieter and softer than the previous version.
Head after the break for step by step tear down and video.

Before anyone could blend or break the Galaxy S II down to its components, Samsung has released an official tear down of the device. Unlike iFixit step by step dismantling, Samsung offers an overview of its components hidden under that 8.98.49mm thin body.
It shows you where the vital components are located as well as materials used in its construction. For example the back plate uses a 0.1mm thin Hyperskin material which features 3000 chain patterns to prevent scratches, fingerprints and slips.
To check it out in detail, head over to Samsung’s Global Blog.

The iPad 2 is thinner, faster and now comes with 2 cameras. So what’s new in the inside? We let the experts at iFixit to show us the internals.
Among the things they have revealed is the front panel is now fused with adhesive, requiring some heat to remove. Luckily for the LCD, it is merely secured by couple of screws. The battery is said to be 6930mAh at 3.7V. During the dismantling process, iFixit used a standard Philips screwdriver and they didn’t encounter any weird looking screws.
On the smart cover, iFixit has showed that the easy snap on action is actually made possible by having a strip of magnets lined along the side opposite the volume controls. The sleep/wake action of the smart cover is sensed by a small circuitry which detects the magnetic portion of the cover.
Check out the step by step dismantling process after the break.

The Motorola Atrix 4G has gone under the knife by iFixit, the guys that give us excellent view of gadgetary innards.
In terms of repairability, the Motorola Atrix seems pretty easy to dismantle with the rating of 9 out of 10. Most of the phone components are held together with screws and plastics and adhesives are hardly used. Even the high resolution 960×480 LCD screen is not fused with the front panel, making screen replacements a breeze.
Check out the full step by step dissecting of the Atrix here.

Earlier on we’ve seen a brutal prying of Samsung Galaxy Tab which revealed its internals partially. Now it’s time to see how it is done by the professionals. iFixit which does high quality dissecting guides now has their hands on the Samsung Galaxy Tab and they are giving it their signature tear down treatment.
In the earlier prying, the person mentioned that the glass seems to be fused together with the frame, which makes repair more complicated if it is broken. iFixit too had a hard time removing the glass that they even used a heat gun! This makes the Tab score high marks for difficulty level.
Check out the step by step tear down at iFixit.

The Samsung Galaxy Tab has been pried open, not by ifixit but JkkMobile. Obviously this wasn’t a proper dismantle process that we’re used to and the person doing it says that it was a nasty experience and advise viewers not to try this at home. Some excessive force is required to force open the plastic back.
In the video, he showed the massive 4000mAh battery which occupies nearly half of the tablet and the external sound comes from 2 speaker boxes which is bigger than we would expect. Looking towards the glass, the gorilla glass seems to be fused with the frame, making it possibly more costly and difficult to repair if the glass is broken.
Another surprise is there’s an empty slot towards the sides where he demonstrated a possible stylus could be stored inside. We suspect this area he mentioned might be for the antenna used for DMB TV which is Mobile TV feature that was shown in the Korean model.
Check out the full video after the break.

We’re getting more curious on this little 5″ Android tablet device after being teased that its coming to Malaysia. It so happen that the folks at iFixit has done a teardown on the Dell Streak as well. Now we’re able to take a closer peek on the device and what goes inside.
According to their findings, the Dell Streak has easy access to its battery and it seems easy to dismantle as well. The components are connected using standard ZIF cable which is good for ease of removal. However they found that the back plastic cover is a little cheap for a $600 device like this. Another discovery they shared is that the front Gorilla glass is bonded together with the LCD. If you cracked the glass, you would need to replace the whole thing including the LCD which would probably cost a bomb.
